BookDrive Pro Software Manual
From Atiz Support Wiki
| Revision as of 10:32, 13 February 2009 Noppadol (Talk | contribs) ← Previous diff |
Revision as of 11:27, 13 February 2009 Noppadol (Talk | contribs) Next diff → |
||
| Line 1: | Line 1: | ||
| - | == '''Safety Precautions''' == | + | == '''How to set up the software''' == |
| - | Assemble everything on the floor first. Once the assembly is complete, carry the whole machine with at least 2 persons from the floor to the table. | + | BookDrive DIY comes with 2 applications. |
| - | * Place the machine on a level surface to ensure proper working condition. Do not tilt the machine. | + | 1. BookDrive Capture – for controlling the cameras and capturing the images |
| - | *Do not place the machine near heaters or volatile, flammable or combustible materials that may catch fire. | + | |
| - | *BookDrive DIY is not designed to be lifted. Do not lift or relocate the machine once it has been fully assembled. To relocate the machine, de-assemble it into parts first and then re-assemble them again at the desired location. | + | |
| + | 2. BookDrive Editor Pro – for image processing and making e-books | ||
| - | == '''Getting to know your BookDrive DIY''' == | ||
| - | ''' | ||
| - | BookDrive DIY has the following components.''' | ||
| - | [[Image:Diy-hardware-001.png | BookDrive DIY components]] | + | [[Image:diy_software_setup_1.jpg]] |
| - | == '''How to assemble the platform''' == | ||
| - | '''Step 1''' Place the base on the table and connect the left and right legs to the base as shown. | ||
| - | [[Image:Diy-hardware-step1.png]] | + | BookDrive Capture 3 has two modes for operation: Single PC and Dual PC modes. |
| - | '''Step 2''' Tighten 3 knobs on the front, 3 knobs on the rear and 2 knobs on the inner side of each leg. | ||
| - | [[Image:DIY-hardware-step2.png]] | + | '''Single PC mode''' |
| - | '''Step 3''' Connect the arm to the leg. The sticker on the end of the arm should match with the sticker on the end of the leg. Then tighten the knobs. Repeat on the other side. | + | The Single PC mode allows a sequential shooting (one camera shooting at a time), resulting in |
| + | maximum capture speed of 500‐700 pages an hour. | ||
| - | [[Image:DIY-hardware-step3.png]] | ||
| - | '''Step 4''' Fix the V glass with the arm connector. Tighten 2 knobs with nuts at each left and right side. | + | '''Dual PC mode''' |
| - | [[Image:DIY-hardware-step4.png]] | + | To make 2 cameras capture at the same time thus reducing waiting time, it requires 2 PCs, each connecting to one camera. Both PCs are connected together via a LAN network. This mode is recommended only for advanced users. |
| - | '''Step 5''' Install the springs on both sides. | ||
| - | [[Image:DIY-hardware-step5.png]] | + | The following picture summarizes the key differences of Single PC mode VS. Dual PC Mode |
| - | '''Step 6''' Straighten the top bar. Attach the lighting hanger to the top bar and tighten the 2 knobs. | ||
| - | [[Image:DIY-hardware-step6.png]] | + | [[Image:diy_software_setup_2.jpg]] |
| - | '''Step 7''' Attach the top bar to the platform. Tighten the 4 knobs on each side securely. | ||
| - | [[Image:DIY-hardware-step7.png]] | + | == '''Workflow comparison''' == |
| - | '''Step 8''' Attach the lamps to the lamp hanger. Tighten the knobs on both lamps. Plug the AC cord into each lamp. | ||
| - | [[Image:DIY-hardware-step8.png]] | + | [[Image:diy_software_workflow.jpg]] |
| - | '''Step 9''' Put 2 little plastic pieces in the shade’s hole and connect them together to form a frame. | ||
| - | [[Image:DIY-hardware-step9.png]] | + | == '''Installing the Software''' == |
| - | [[Image:DIY-hardware-step9-2.png]] | ||
| - | '''Step 10''' Attach the shade to the top bar. | + | '''Step 1''' Make sure you’ve successfully installed Canon drivers and software that come with the cameras. Do not proceed to next step if you still can’t do PC remote shooting using the Canon software. |
| - | [[Image:DIY-hardware-step10.png]] | + | |
| + | [[Image:diy_software_install_1.jpg]] | ||
| + | |||
| + | |||
| + | '''Step 2''' The software that you have to install is based on the mode that you want to run. | ||
| + | * For Single PC mode, install BookDrive Capture and BookDrive Editor Pro on | ||
| + | the Master PC. | ||
| + | * For Dual PC mode, install BookDrive Capture and BookDrive Editor Pro on the | ||
| + | Master PC and install Capture Slave on the Slave PC. | ||
| + | |||
| + | |||
| + | [[Image:diy_software_install_2_1.jpg]] | ||
| + | |||
| + | |||
| + | To install, close any running programs, insert the Atiz software CD into the | ||
| + | computer’s disc drive and select the appropriate mode of your installation. | ||
| + | |||
| + | |||
| + | You will not find this screen if you download the software directly from Atiz website. | ||
| + | |||
| + | |||
| + | [[Image:diy_software_install_2_2.jpg]] | ||
| + | |||
| + | |||
| + | The appropriate programs will be pre-selected for installation based on the | ||
| + | installation mode you selected. | ||
| + | |||
| + | |||
| + | [[Image:diy_software_install_2_3.jpg]] | ||
| + | |||
| + | |||
| + | [[Image:diy_software_install_2_4.jpg]] | ||
| + | |||
| + | |||
| + | '''IMPORTANT:''' If you are going to run Dual PC mode, do not forget to install | ||
| + | |||
| + | |||
| + | '''Step 3''' Once finished, the shortcuts to the programs (on the Master PC, BookDrive | ||
| + | |||
| + | |||
| + | [[Image:diy_software_install_3.jpg]] | ||
| + | Capture and BookDrive Editor Pro will appear on your desktop. | ||
| + | Capture Slave on the Slave PC. | ||
| + | |||
| + | |||
| + | == '''Steps to activate the software''' == | ||
| + | |||
| + | Next step is to separately activate the BookDrive Capture and BookDrive Editor Pro software. | ||
| + | |||
| + | Without activation, the program will be in trial mode and expire in 15 days. | ||
| + | |||
| + | |||
| + | '''Step 1''' To activate BookDrive Capture, open the program. You will see the Product Registration dialog. | ||
| + | |||
| + | |||
| + | [[Image:diy_software_activate_1.jpg]] | ||
| + | |||
| + | |||
| + | '''Step 2''' Please locate your Registration Code for BookDrive Capture in the Warranty Card and fill it in the dialog. | ||
| + | |||
| + | |||
| + | [[Image:diy_software_activate_2.jpg]] | ||
| + | |||
| + | |||
| + | '''Step 3''' Click '''Get Activation Code from the Internet''' | ||
| + | |||
| + | |||
| + | [[Image:diy_software_activate_3.jpg]] | ||
| + | |||
| + | |||
| + | '''Step 4''' You will be redirected to an Atiz web page. Please fill in your information and click '''Submit'''. | ||
| + | |||
| + | |||
| + | [[Image:diy_software_activate_4.jpg]] | ||
| + | |||
| + | |||
| + | Atiz will use this info to contact you in the future when software upgrades are | ||
| + | available. | ||
| + | |||
| + | |||
| + | '''Step 5''' If the Registration Code is correct, the page will give you the Activation Code. | ||
| + | |||
| + | |||
| + | [[Image:diy_software_activate_5.jpg]] | ||
| + | |||
| + | |||
| + | '''Step 6''' Copy that Activation Code and paste it on the Registration window | ||
| + | |||
| + | |||
| + | [[Image:diy_software_activate_6.jpg]] | ||
| + | |||
| + | |||
| + | '''Step 7''' Click Activate and the program will activate successfully. | ||
| + | |||
| + | |||
| + | [[Image:diy_software_activate_7.jpg]] | ||
| + | |||
| + | |||
| + | '''Step 8''' Now you are done with the activation of BookDrive Capture. Repeat step 1-7 to activate BookDrive Editor Pro. | ||
| + | |||
| + | [[Image:diy_software_activate_8.jpg]] | ||
| + | |||
| + | |||
| + | == '''Setting up for Dual PC mode for the first time''' == | ||
| + | |||
| + | 1. Open Capture Slave on the Slave PC. | ||
| + | |||
| + | |||
| + | [[Image:diy_software_dual_1.jpg]] | ||
| + | |||
| + | |||
| + | 2. First, we need to do a network setting at the Slave PC. | ||
| + | |||
| + | |||
| + | For Vista ‐‐ '''Start / Control Panel / Network and Sharing Center''' | ||
| + | |||
| + | |||
| + | 3. Select Manage network connections | ||
| + | |||
| + | |||
| + | [[Image:diy_software_dual_3.jpg]] | ||
| + | |||
| + | |||
| + | 4. Right click at the Local Area Connection and select Properties | ||
| + | |||
| + | |||
| + | [[Image:diy_software_dual_4.jpg]] | ||
| + | |||
| + | |||
| + | 5. Select '''Internet Protocol Version 4 (TCP/IP)''' and click '''Properties''' | ||
| + | |||
| + | |||
| + | [[Image:diy_software_dual_5.jpg]] | ||
| + | |||
| + | |||
| + | 6. Select Use the following IP address: and fill in the number 192.168.1.2 | ||
| + | |||
| + | |||
| + | [[Image:diy_software_dual_6.jpg]] | ||
| + | |||
| + | |||
| + | 7. At this point, the setting at the Slave PC is done. You can proceed to do a set upon the Master PC. | ||
| + | |||
| + | |||
| + | 8. You can now use the peripherals from the slave PC to use with the Master PC. | ||
| + | You may need 2 computers. But only 1 set of monitor, keyboard and mouse is enough. | ||
| + | |||
| + | |||
| + | 9. It’s time to configure network settings on the Master PC. The procedure is similar to what you just did on the Slave PC. But this time, instead of setting the IP value as 192.168.1.2 as you did in the Slave PC, on Master PC, it has to be 192.168.1.1 | ||
| + | |||
| + | |||
| + | 10. Now on the Master PC, let’s check if the Master PC can communicate with the | ||
| + | Slave PC properly. | ||
| + | |||
| + | |||
| + | 11. Click '''Start''', type '''cmd''' and Enter | ||
| + | |||
| + | |||
| + | [[Image:diy_software_dual_11.jpg]] | ||
| + | |||
| + | |||
| + | 12. Type ping 192.168.1.2 | ||
| + | |||
| + | |||
| + | [[Image:diy_software_dual_12.jpg]] | ||
| + | |||
| + | |||
| + | 13. If the communication is a success, you will get a reply like this: | ||
| + | |||
| + | |||
| + | [[Image:diy_software_dual_13_1.jpg]] | ||
| + | |||
| + | |||
| + | If the communication attempt is not successful, it will show Request timed out: | ||
| + | |||
| + | |||
| + | [[Image:diy_software_dual_13_2.jpg]] | ||
| + | |||
| + | |||
| + | 14. After you have installed the BDC Master and have checked that the communication with the Slave PC is successful, now you are ready to do a simultaneous shooting. | ||
| + | |||
| + | |||
| + | Open the BookDrive Capture program on the Master PC. | ||
| + | |||
| + | |||
| + | [[Image:diy_software_dual_14.jpg]] | ||
| + | |||
| + | |||
| + | 15. Click '''Tools''' and '''Settings''' | ||
| + | |||
| + | |||
| + | Select Use the '''following address''' and fill in '''192.168.1.2''' and '''OK''' | ||
| + | |||
| + | |||
| + | [[Image:diy_software_dual_15.jpg]] | ||
| + | |||
| + | |||
| + | 16. Click '''the networked camera icon''' | ||
| + | |||
| + | |||
| + | [[Image:diy_software_dual_16.jpg]] | ||
| + | |||
| + | |||
| + | 17. BookDrive Capture on the Master PC will attempt to connect with Capture Slave on the Slave PC. | ||
| + | |||
| + | |||
| + | [[Image:diy_software_dual_17_1.jpg]] | ||
| + | |||
| + | |||
| + | Once the network communication is successful, it will show '''Connected'''. | ||
| + | |||
| + | |||
| + | [[Image:diy_software_dual_17_2.jpg]] | ||
| + | |||
| + | |||
| + | 18. Connect the camera on the right (pointing toward the left page) to the Master PC, and connect the camera on the left (pointing toward the right page) to the Slave PC. | ||
| + | |||
| + | Turn on both cameras. | ||
| + | |||
| + | |||
| + | 19. BookDrive Capture should be able to detect both cameras as shown here. | ||
| + | |||
| + | |||
| + | [[Image:diy_software_dual_19.jpg]] | ||
| + | |||
| + | |||
| + | 20. Click the Capture button to fire up shooting! | ||
| + | |||
| + | |||
| + | [[Image:diy_software_dual_20.jpg]] | ||
Revision as of 11:27, 13 February 2009
Contents |
How to set up the software
BookDrive DIY comes with 2 applications.
1. BookDrive Capture – for controlling the cameras and capturing the images
2. BookDrive Editor Pro – for image processing and making e-books
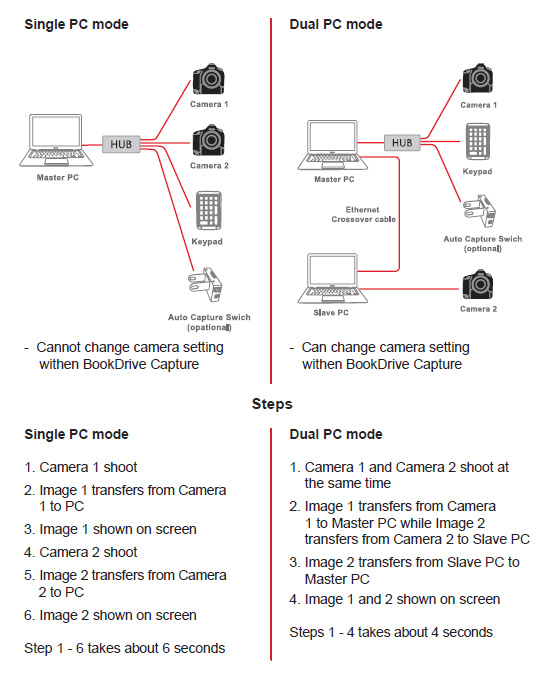
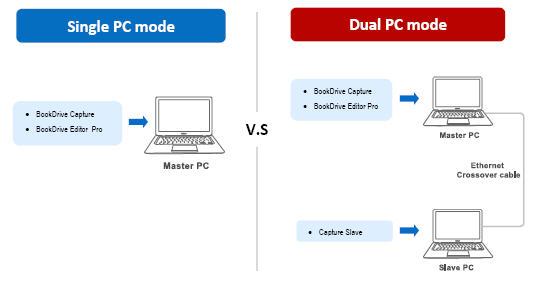
BookDrive Capture 3 has two modes for operation: Single PC and Dual PC modes.
Single PC mode
The Single PC mode allows a sequential shooting (one camera shooting at a time), resulting in maximum capture speed of 500‐700 pages an hour.
Dual PC mode
To make 2 cameras capture at the same time thus reducing waiting time, it requires 2 PCs, each connecting to one camera. Both PCs are connected together via a LAN network. This mode is recommended only for advanced users.
The following picture summarizes the key differences of Single PC mode VS. Dual PC Mode
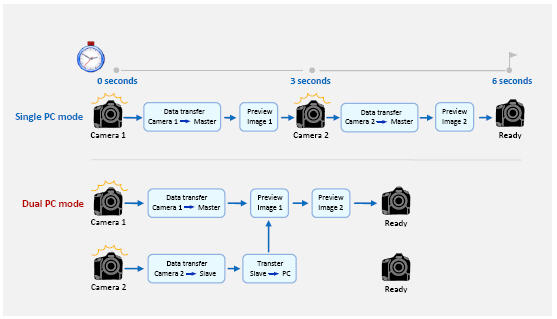
Workflow comparison
Installing the Software
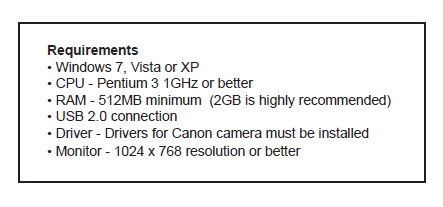
Step 1 Make sure you’ve successfully installed Canon drivers and software that come with the cameras. Do not proceed to next step if you still can’t do PC remote shooting using the Canon software.
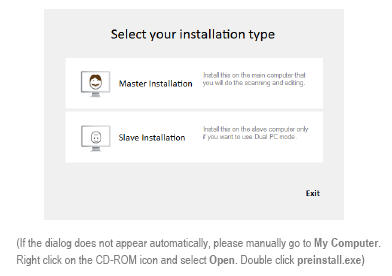
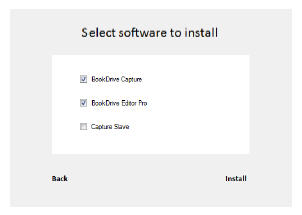
Step 2 The software that you have to install is based on the mode that you want to run.
- For Single PC mode, install BookDrive Capture and BookDrive Editor Pro on
the Master PC.
- For Dual PC mode, install BookDrive Capture and BookDrive Editor Pro on the
Master PC and install Capture Slave on the Slave PC.
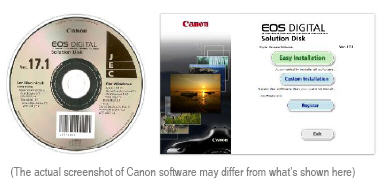
To install, close any running programs, insert the Atiz software CD into the
computer’s disc drive and select the appropriate mode of your installation.
You will not find this screen if you download the software directly from Atiz website.
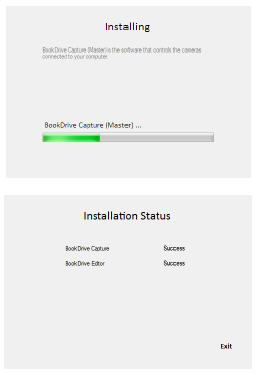
The appropriate programs will be pre-selected for installation based on the
installation mode you selected.
IMPORTANT: If you are going to run Dual PC mode, do not forget to install
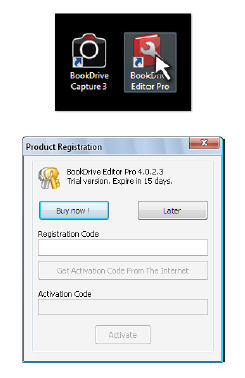
Step 3 Once finished, the shortcuts to the programs (on the Master PC, BookDrive
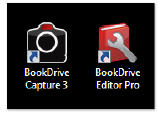 Capture and BookDrive Editor Pro will appear on your desktop.
Capture Slave on the Slave PC.
Steps to activate the software
Next step is to separately activate the BookDrive Capture and BookDrive Editor Pro software.
Without activation, the program will be in trial mode and expire in 15 days.
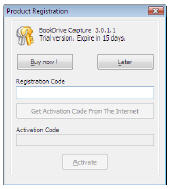
Step 1 To activate BookDrive Capture, open the program. You will see the Product Registration dialog.
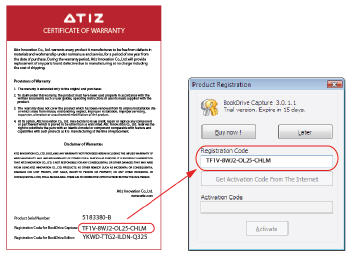
Step 2 Please locate your Registration Code for BookDrive Capture in the Warranty Card and fill it in the dialog.
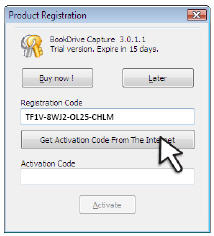
Step 3 Click Get Activation Code from the Internet
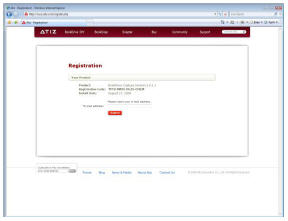
Step 4 You will be redirected to an Atiz web page. Please fill in your information and click Submit.
Atiz will use this info to contact you in the future when software upgrades are
available.
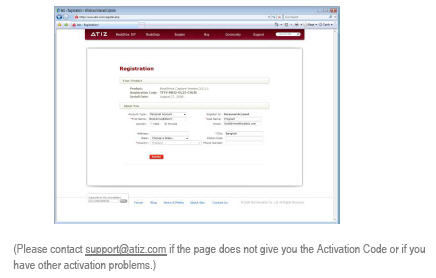
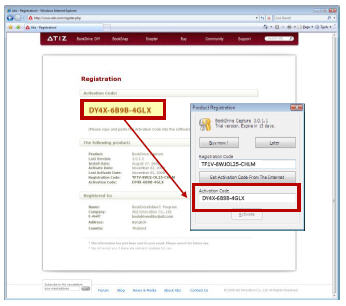
Step 5 If the Registration Code is correct, the page will give you the Activation Code.
Step 6 Copy that Activation Code and paste it on the Registration window
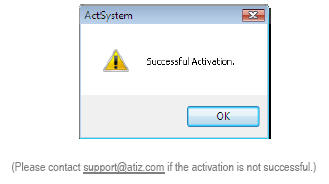
Step 7 Click Activate and the program will activate successfully.
Step 8 Now you are done with the activation of BookDrive Capture. Repeat step 1-7 to activate BookDrive Editor Pro.
Setting up for Dual PC mode for the first time
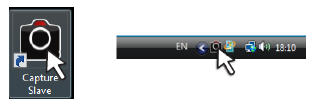
1. Open Capture Slave on the Slave PC.
2. First, we need to do a network setting at the Slave PC.
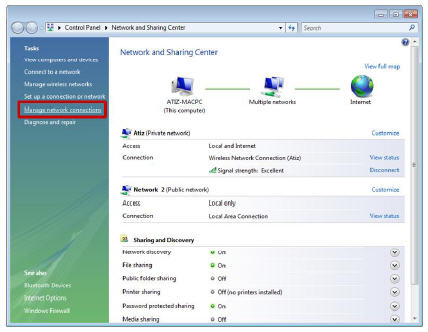
For Vista ‐‐ Start / Control Panel / Network and Sharing Center
3. Select Manage network connections
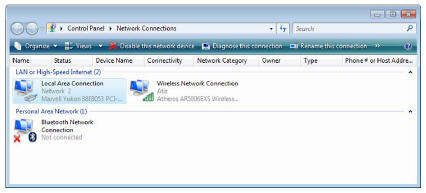
4. Right click at the Local Area Connection and select Properties
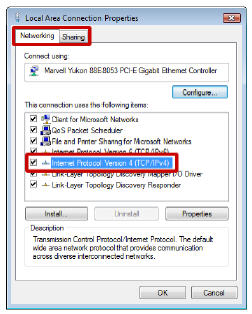
5. Select Internet Protocol Version 4 (TCP/IP) and click Properties
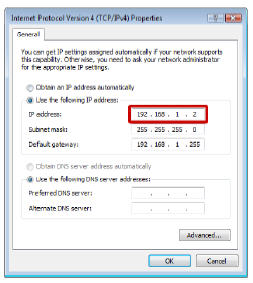
6. Select Use the following IP address: and fill in the number 192.168.1.2
7. At this point, the setting at the Slave PC is done. You can proceed to do a set upon the Master PC.
8. You can now use the peripherals from the slave PC to use with the Master PC.
You may need 2 computers. But only 1 set of monitor, keyboard and mouse is enough.
9. It’s time to configure network settings on the Master PC. The procedure is similar to what you just did on the Slave PC. But this time, instead of setting the IP value as 192.168.1.2 as you did in the Slave PC, on Master PC, it has to be 192.168.1.1
10. Now on the Master PC, let’s check if the Master PC can communicate with the
Slave PC properly.
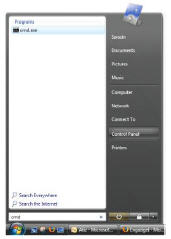
11. Click Start, type cmd and Enter
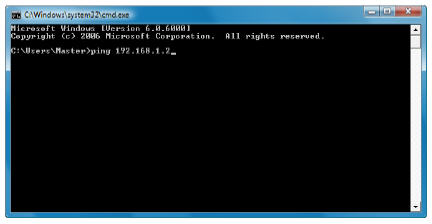
12. Type ping 192.168.1.2
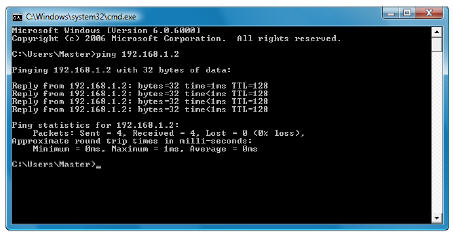
13. If the communication is a success, you will get a reply like this:
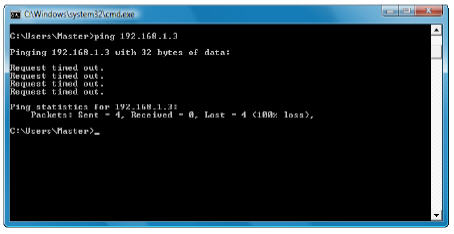
If the communication attempt is not successful, it will show Request timed out:
14. After you have installed the BDC Master and have checked that the communication with the Slave PC is successful, now you are ready to do a simultaneous shooting.
Open the BookDrive Capture program on the Master PC.
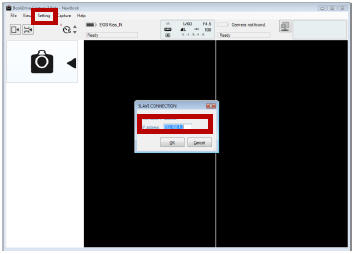
15. Click Tools and Settings
Select Use the following address and fill in 192.168.1.2 and OK
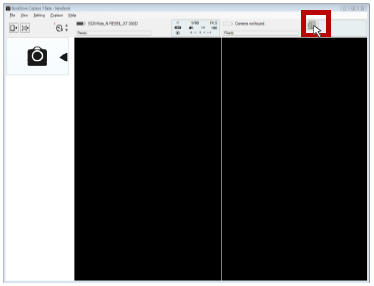
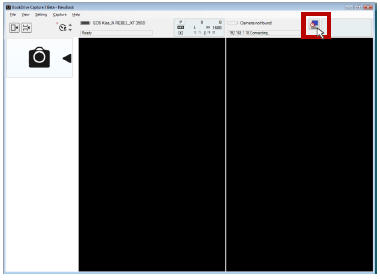
16. Click the networked camera icon
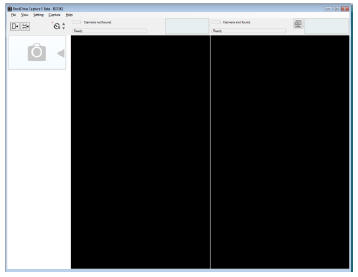
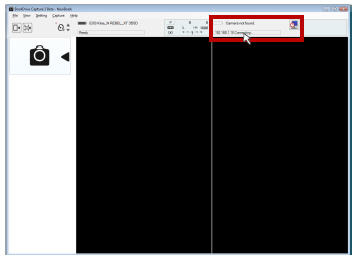
17. BookDrive Capture on the Master PC will attempt to connect with Capture Slave on the Slave PC.
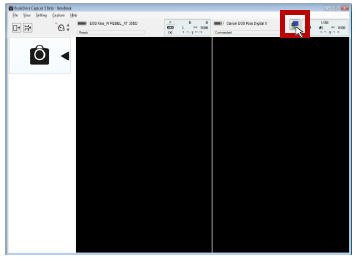
Once the network communication is successful, it will show Connected.
18. Connect the camera on the right (pointing toward the left page) to the Master PC, and connect the camera on the left (pointing toward the right page) to the Slave PC.
Turn on both cameras.
19. BookDrive Capture should be able to detect both cameras as shown here.
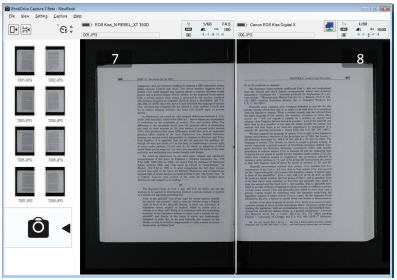
20. Click the Capture button to fire up shooting!
