BookSnap Hardware Manual
From Atiz Support Wiki
| Revision as of 03:11, 13 February 2009 Noppadol (Talk | contribs) ← Previous diff |
Revision as of 05:41, 17 February 2009 Noppadol (Talk | contribs) Next diff → |
||
| Line 796: | Line 796: | ||
| Please visit http://www.atiz.com/cust_service for more information or contact support@atiz.com for your problems. | Please visit http://www.atiz.com/cust_service for more information or contact support@atiz.com for your problems. | ||
| + | |||
| + | |||
| + | <center>[<center>[http://www.atiz.com/Download/pdf-file/booksnap.pdf Download PDF File Version]</center> | ||
| + | link title]</center> | ||
Revision as of 05:41, 17 February 2009
About the Manual
Under copyright laws this manual may not be copied in whole or in part without written permission of Atiz.
Atiz and BookSnap are trademarks of Atiz Innovation Co., Ltd., registered in the U.S. and other countries.
Use of the Atiz logo or BookSnap logo for commercial purpose without the prior
written permission of Atiz may constitute trademark infringement and unfair
competition in violation of federal and state laws.
Every effort has been made to ensure that the information in this manual is accurate.
Atiz is not responsible for printing or clerical errors.
Atiz Innovation Co., Ltd.
General Information
Introduction
Thank you for choosing BookSnap, a digital, camera-based, book scanning solution.With BookSnap you are able to create high-quality digital books. This manual will assist you in familiarizing yourself with the device. It contains all the necessary information for set up functions and capabilities.
Copyright Notice
The use of this scanner is subjected to the applicable copyrights for the documents you are scanning. Please observe all copyright laws very carefully. Any use of this scanner that infringes on copyrights of others is strictly prohibited.
Unique Characteristics of BookSnap
BookSnap is a revolutionary new device that will help users digitize bound content quickly without destroying the book. Its sleek design and unique, gentle, V-shaped book cradle will make capturing images from books, magazines and journals seem as easy as taking a picture with a digital camera. This compact device allows for book digitization at a blazing speed of 500 pages per hour.
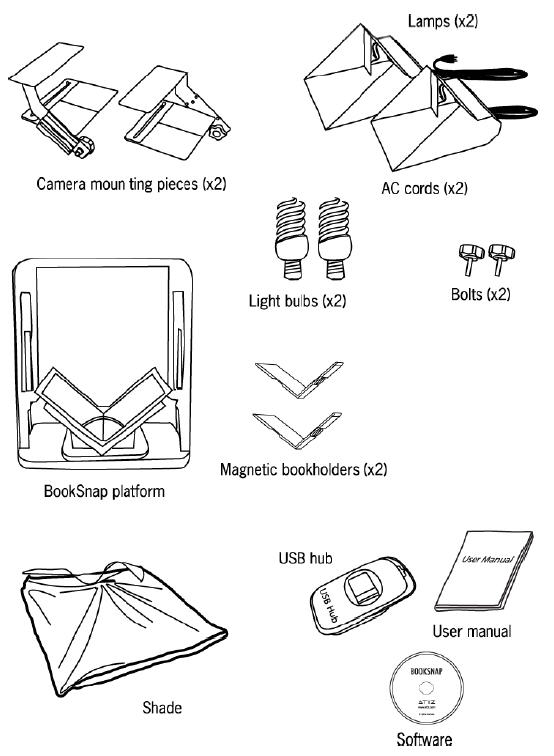
Box Contents
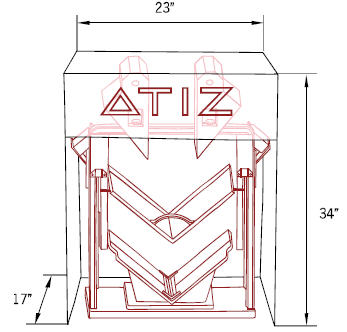
Dimension & Weight
Dimension:
- Depth: 17 inches
- Width: 23 inches
- Height: 34 inches
Weight:
- 20 kg. (44 lbs.)
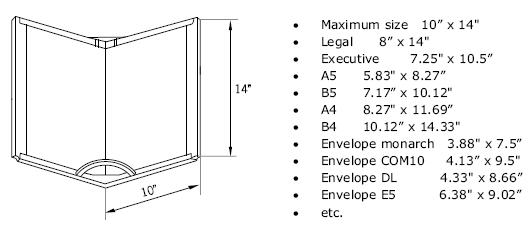
Page Size Support
BookSnap supports pages that are within 10 x14 inches. Some supported standard sizes include:
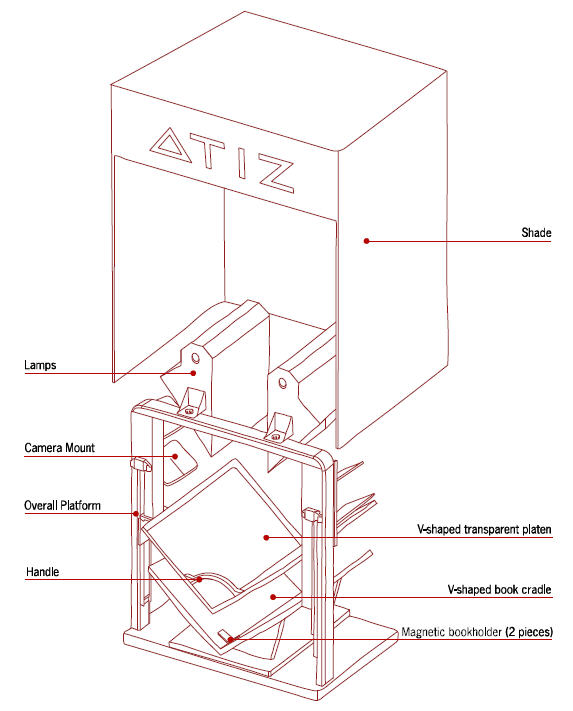
Part Identification
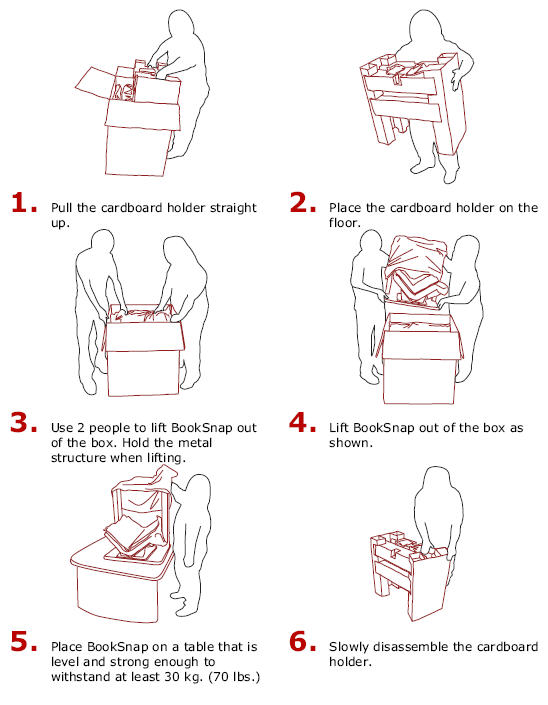
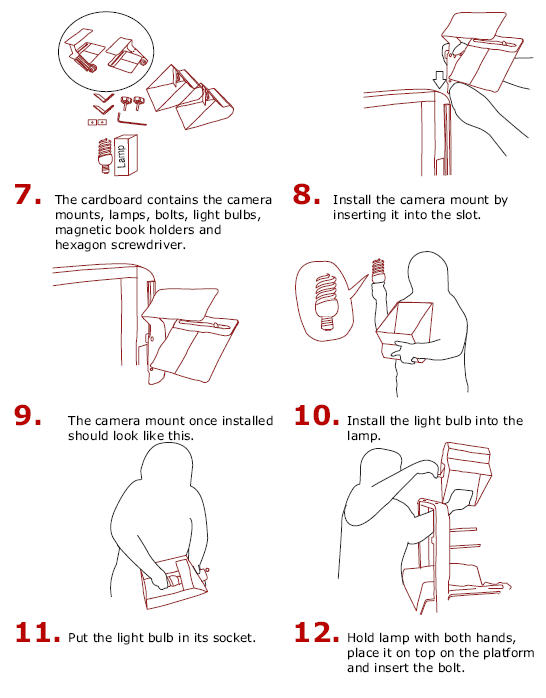
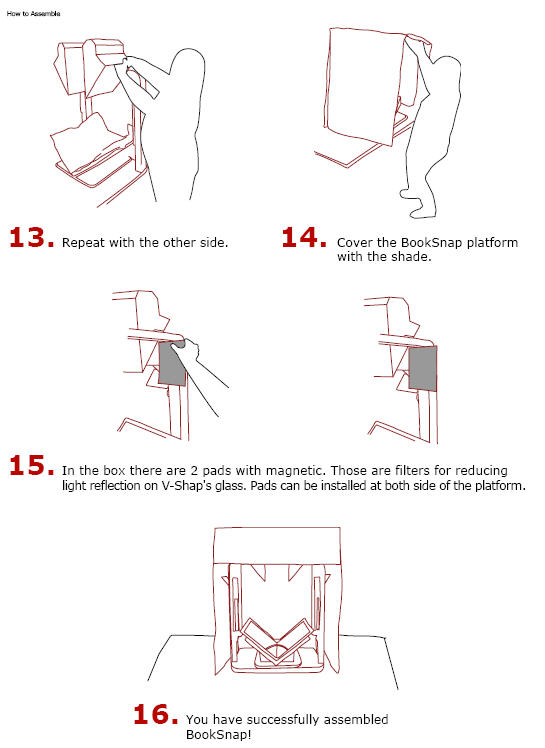
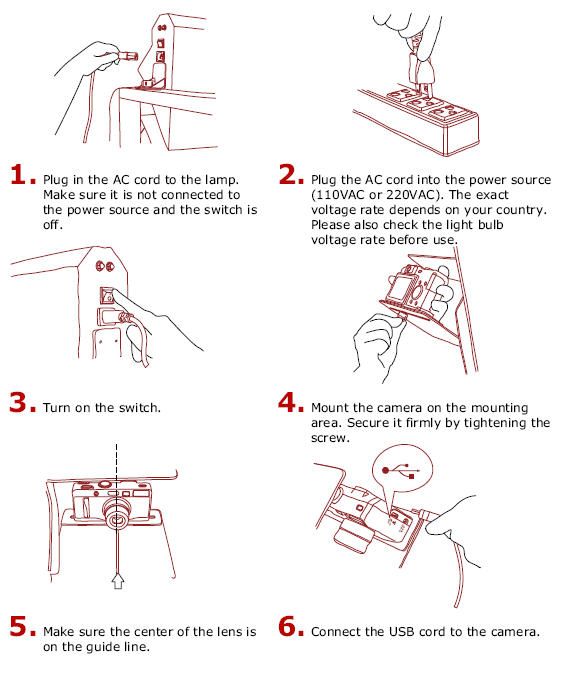
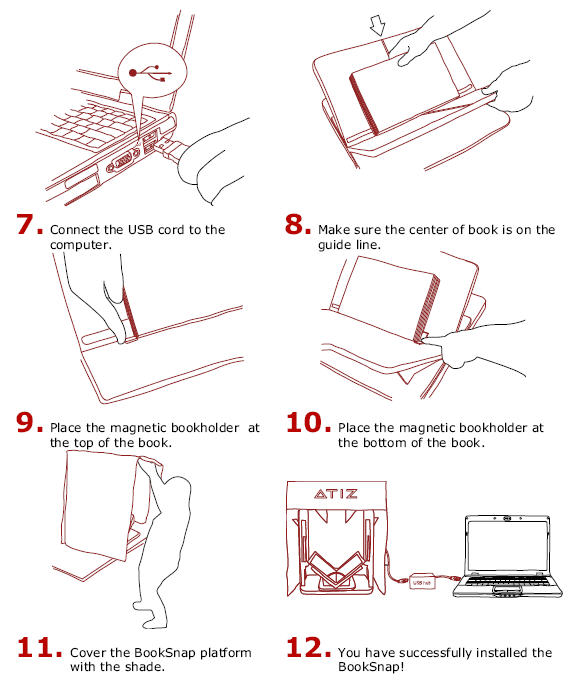
How to Assemble
System Requirements
Note:
BookSnap comes with 2 software packages:
1. BookSnap software (for controlling the cameras)
2. BookDrive Editor (for post image processing)
Due to the SDK provided by Canon, BookSnap software currently does not
support Windows Vista. It does work only on Windows XP (Service Pack 2).
As for BookDrive Editor, it works on both Windows XP and Windows Vista.
How to Install the Software
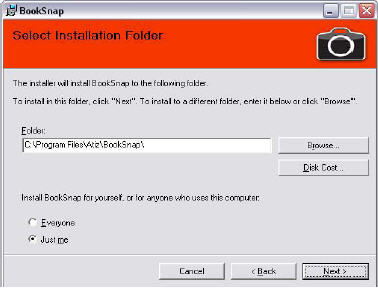
Installation Procedure
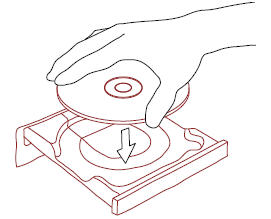
1. Close any programs that are running and insert the Atiz software CD into the computer’s drive.
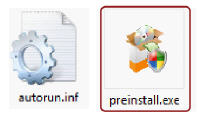
If the installation panel does not appear automatically, please use the
following procedure.
- Open My Computer
- Right-click the CD-ROM icon and select Open.
- Double-click preinstall.exe
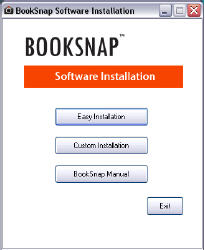
2. After a few seconds, you should see the following dialog come up.
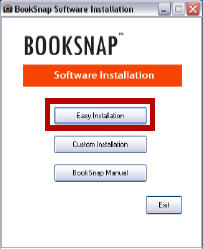
3. Select Easy Installation. Two software programs will be installed.They are BookSnap software (for capturing images) and BookDrive Editor software (for processing the images).
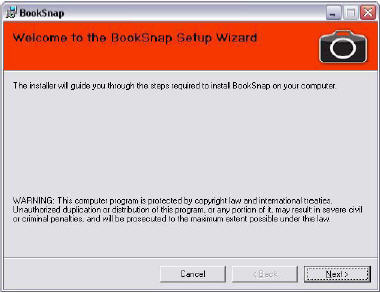
4. Proceed to next steps by selecting Next.
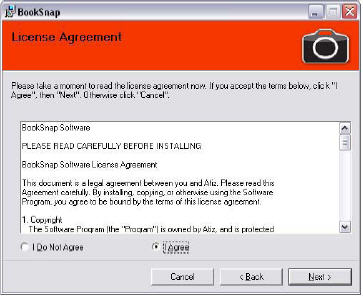
5. Please review the License Agreement. If you agree, select “I Agree” and click Next.
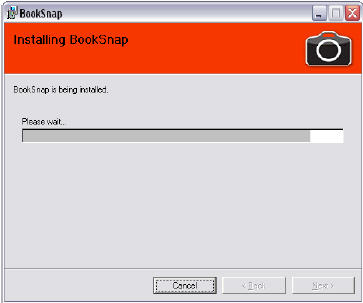
6. BookSnap software will be installed.
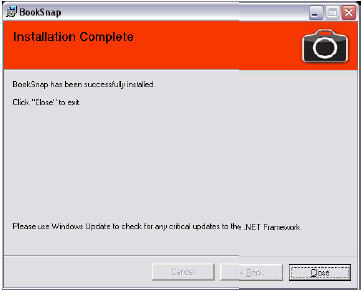
7. After installation of BookSnap software is complete,select Close(to proceed to install another software).
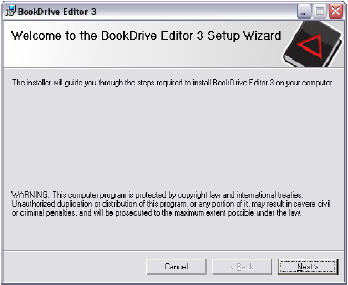
8. The Welcome screen to BookDrive Editor will appear.
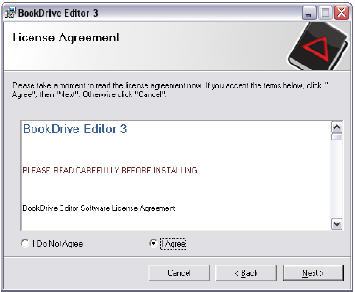
9. Review the License Agreement.If you agree,select “I Agree” and hit Next.
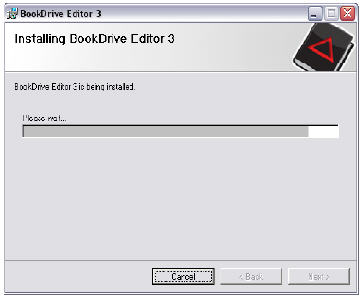
10. Proceed until the installation is complete.
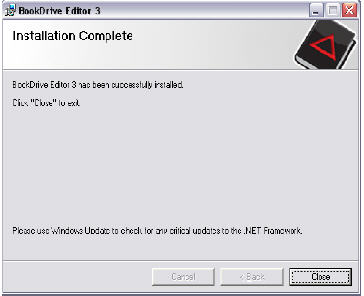
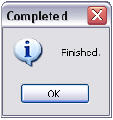
11. It will appear like this when the installation of BookDrive Editor is complete.
Click Close and the OK.
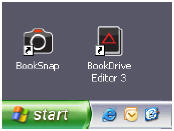
12. BookSnap and BookDrive Editor shortcuts will now appear on your desktop.
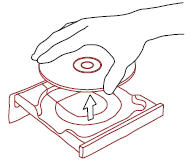
13. Remove the disk from the computer’s drive.
How to Activate the Software
After the software installation is complete, next step is to activate the software.
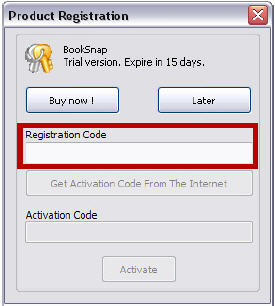
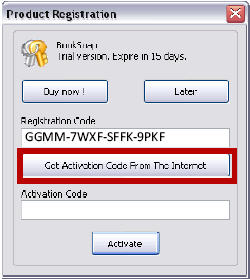
1. After opening the program, you will see the following dialog that asks for registration.
2. Please fill in your Registration Code. (Your Registration Code is
located on the back of your CD case)
3. Once you have filled in the Registration Code, click Get Activation Code From The Internet.
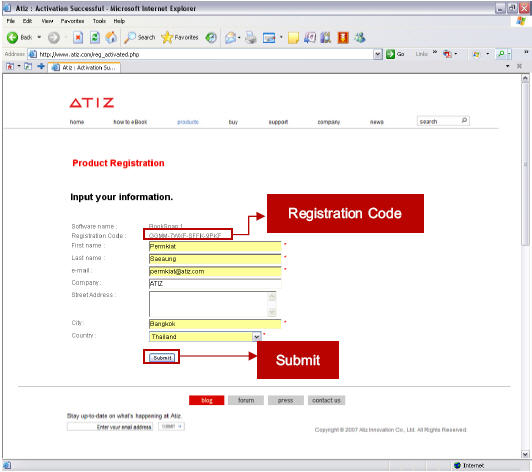
4. You will be redirected to Atiz online registration page.
Please fill in your information.
Atiz will use this information to contact you in the future about the software upgrades when they are available. Once you have filled in the information completely, click Submit
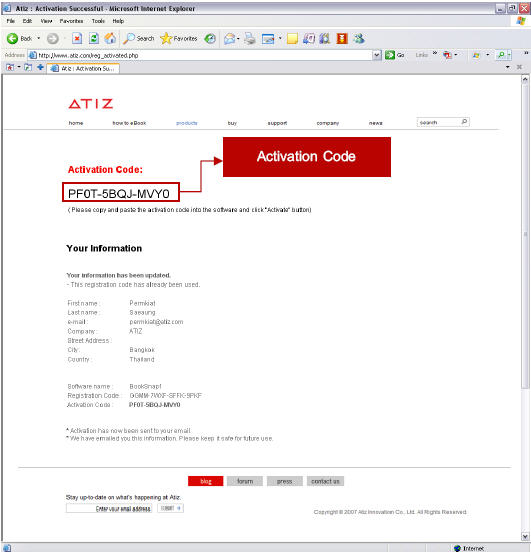
5. The information will be sent to Atiz server. If your information and the
Registration Code are correct, you will receive the Activation Code.
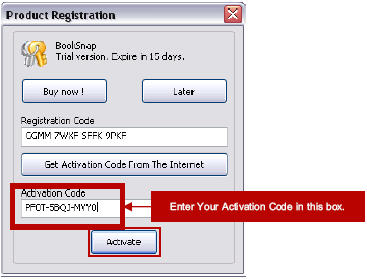
6. The Activation Code is used to activate your copy of the software.Copy your Activation Code and paste it on the Registration window.
(MAKE SURE THERE IS NO BLANK SPACE IN THE BOX).
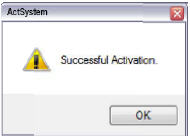
7. Click Activate and the program will finish the installation successfully.
Note : Once your are done with the activation of Booksnap software,repeat this process with the activation of BookDrive Editor software.
How to Scan a Book
1. Start BookSnap software by double clicking the program icon.
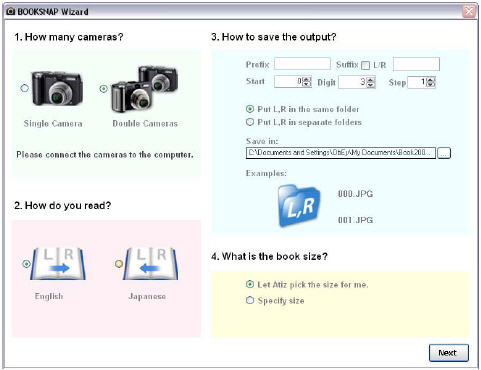
The program will appear like this.
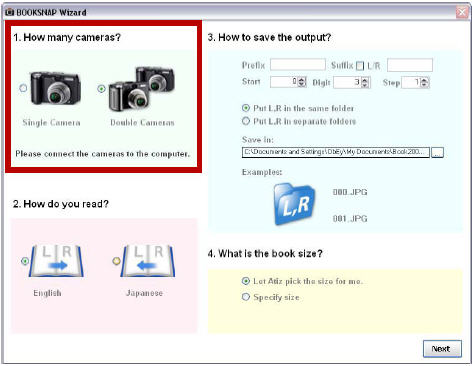
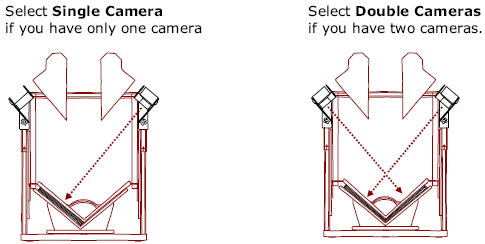
2. Please select whether you are going to use just one camera or two
cameras to scan a book.
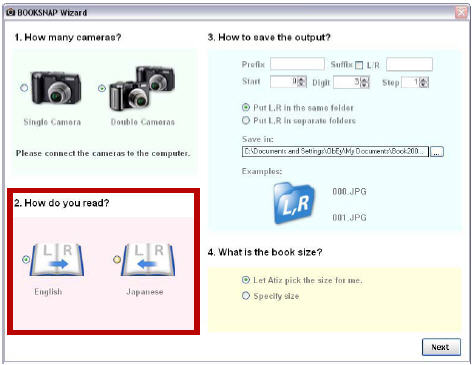
3. Next, select if you want page sequencing to go from left to right (this is
the case for most countries) or from right to left (e.g. Japanese or Korean books, etc.)
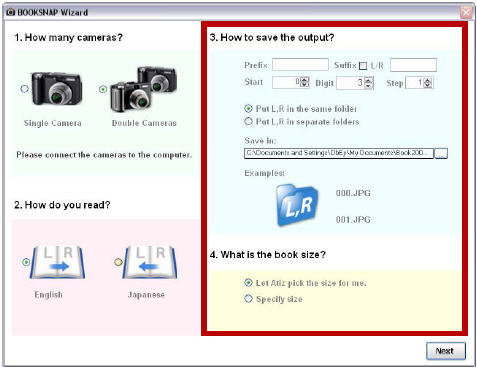
4. Next, select file saving options.
5. After you are done with the Wizard, click Next to proceed to next stage
where you will be able to change settings of the cameras, test the
cameras and preview images.
6. To be able to change settings and shoot test images, the computer first
needs to connect to the cameras.
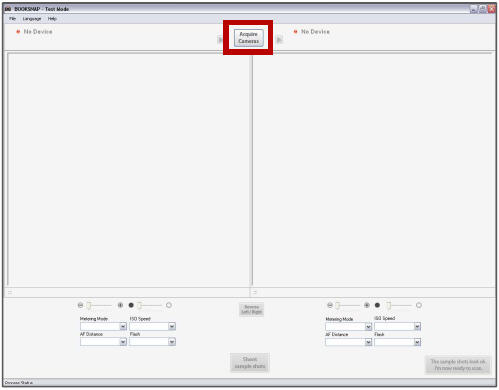
Click Acquire cameras, BookSnap will search for any cameras that are currently connected with the computer.
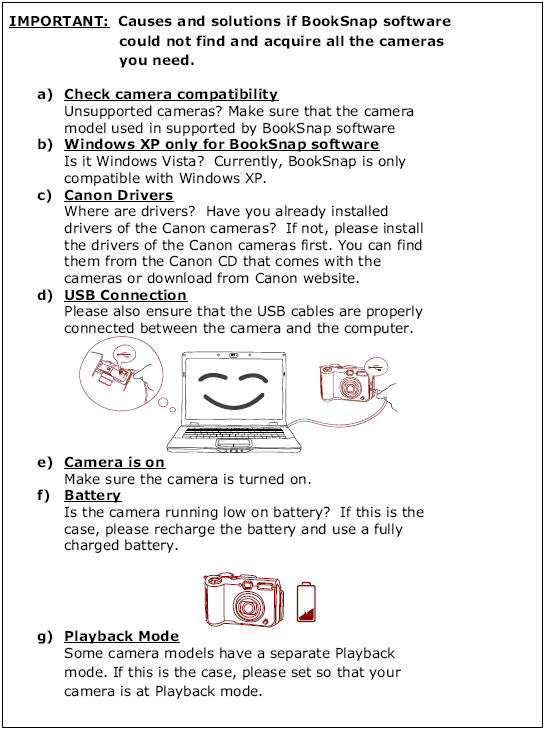
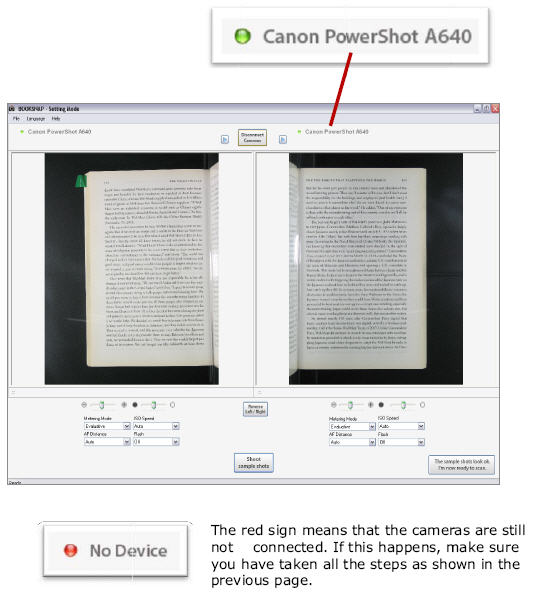
7. If the computer can locate the cameras, there will be a green sign showing that the cameras are now connected.
If the system still cannot acquire the cameras after following all the instruction, please contact Atiz for technical support.
As the cameras are acquired, the cameras will capture some sample shots and here is the page that you should see.
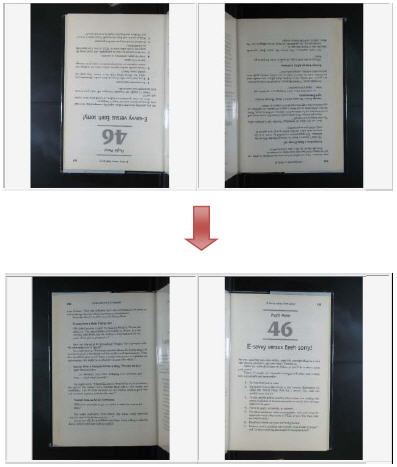
8. If the pages appear inverse like this, you can reverse them by clicking Reverse ![]() button and the pages will become reverse like this.
button and the pages will become reverse like this.
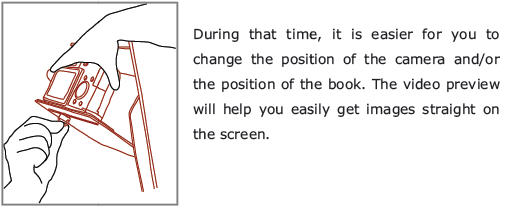
9. To conveniently adjust the relative position of the cameras and the position of the book, you can see live preview (it is like a video stream showing the current position of the page).
10. There are some neat things you can do within the BookSnap software.
For example, you can zoom in or zoom out. You can also adjust brightness and other setting of the cameras.What kind of setting you can adjust depend on the model of the cameras.
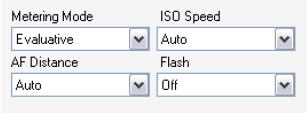 Most Canon camera models allow you to adjust the Metering Mode, ISO Speed, AF Distance and the flash of the cameras.
Note : For good picture quality purpose, flash should always be of is BookSnap.
11. To see what kind of images those setting will produce, click this button
![]() will let you shoot sample shots.
will let you shoot sample shots.
The sample shots will not be saved.They will be discarded as you test next sample shots.
Once you are satisfied with the images that the cameras can produce, proceed to the actual scanning process by hitting ![]()
Now it’s time for some serious scanning.
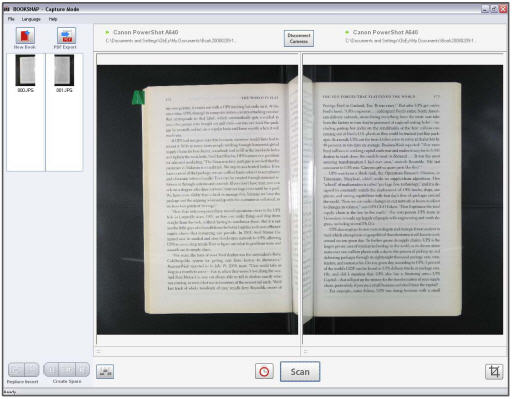
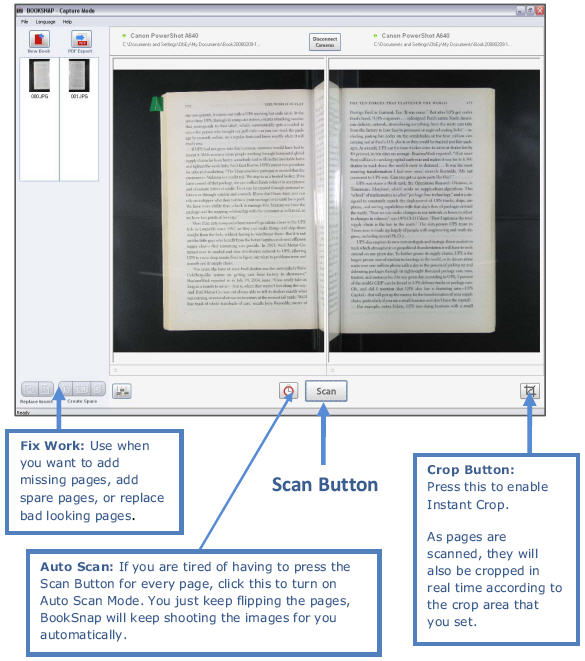
12. This is the main interface of the program during scanning.
13. The process to scan a book is easy.
You just hit Scan Button and then turn a page, hit Scan Button again until completion.
If you are tired of button pressing, click Auto Scan to turn the Auto
Scan mode on and have the program keeps shooting the images for you automatically.
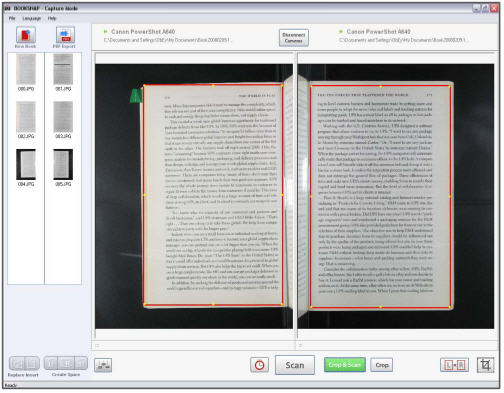
14. If you want your images to be cropped at the same time during
scanning, click Crop Mode Button.
The red rectangle line represents an area to be cropped. What’s inside the rectangle will be kept. What’s outside will be thrown away.
Click the Crop&Scan button to crop the currently shown images and to
scan the next pages.
Click the Crop button to crop the currently shown images when having
no more pages to scan.
Some shots are not great and some pages are missing and I want to correct.
15. You can do that relying on the set of buttons that will allow you to fix the pages.
Use when you want to replace and existing images with a new one.
Examples:
- The images you got are not very clear.
- You got your hands in the shot.
- You haven’t done turning pages yet.
- Page is creased and you want to replace.
Use mouse to select the thumbnail of the image you want to replace. Then click Replace.
Use when you have skipped a page and you want to insert a new page somewhere in between.
Use mouse to select the thumbnail of the image that you want to insert new pages in between. Then click Insert.
Sometimes you just want to have spare pages for comparison purpose so that you can select the best one to use at the end.
Use mouse to select the thumbnail of the image that you want to create its spare.
Note:
Under Instant Crop, the last page and the pages that are added using the Replace, Insert or Create Spare commands will not be cropped by the program.
You must do a little more to help crop those pages.
Steps:
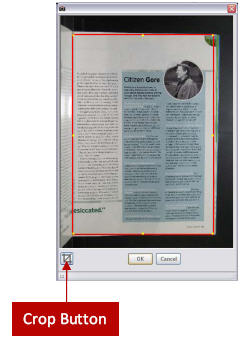
1. Double click the thumbnail of the page that you want to crop
manually and you will see the following dialog.
2. Click Crop Button
3. Set area you want to crop.
4. Click OK. Done.
How to Edit a Book
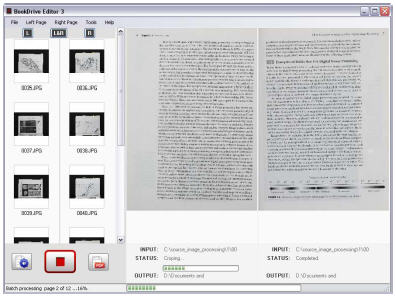
Key Features of BookDrive Editor 3
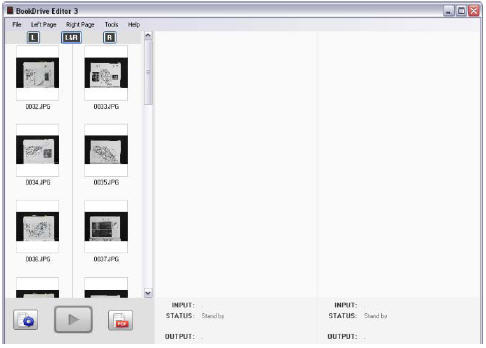
 Start BookDrive Editor software by double
clicking the program icon. The program will
appear and should look like this.
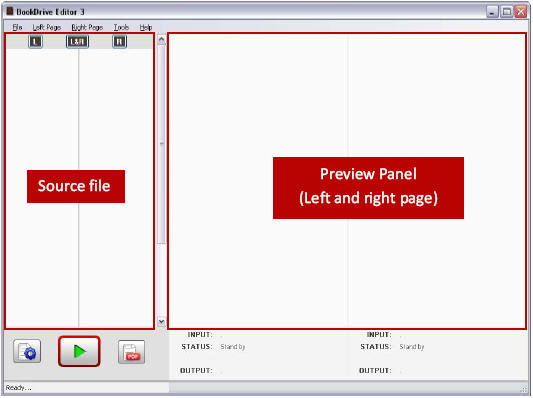
The main interface of the program consists of the left area and the right
area. The left area lists all the source files to be processed. The right area
is a preview panel, which will show output images as they are being
processed.
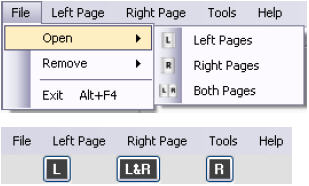
To start, you need to add images to the program. You can do that by either selecting from the menu or simply click its button.
There are many ways to add images to the program:
1. By selecting from the menu. Select File / Open / Left Pages, Right Pages, or Both Pages.
2. By clicking the button.
There are 3 buttons relevant here:
the one showing “L” (meaning to add only the left pages);
the one showing “L&R” (meaning to add both left and right pages); and the one showing “R” (meaning to add only the right pages)
3. By drag and drop. You can also drag and drop left images to the left column and drag and drop right images to the right column.
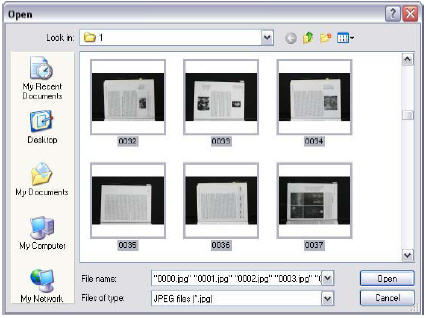
If you click the button, you should see this open window.
The open window allows you to select the files you want to add for processing.
To select many files, do a mouse drag or hold Ctrl while clicking on each image.
To select all, press Ctrl + A.
After select, click Open. The program will add those selected images and show their preview thumbnails.
How images are sorted and put in an order?
The software will automatically sort the selected images based on their file
names. The ones with lower values will be on top. The ones with higher values will at the bottom.
If you select the both L&R page option, the program will sequentially put the first one on the left, the second one on the right, the third one on the left, the fourth one on the right, and so on until the last image.
Next step is to do settings.
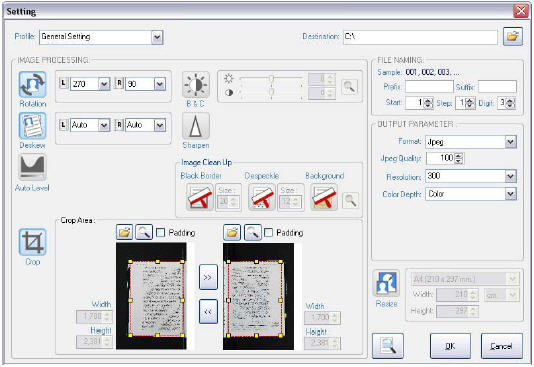
Click Settings button.
You will see the Setting window as shown here:
This is the page where you set all the parameters to make the program produce the final images to your liking.
You do not have to do new settings every time you want to process images.
BookDrive Editor allows you to save all those parameters in what is called a
“Profile”.
Once you have saved the Profile that contains the parameters that you want, next time that you use BookDrive Editor, just select the Profile that you save and open it for use.
The area that allows you to open, save, and delete a Profile looks like this:
Settings
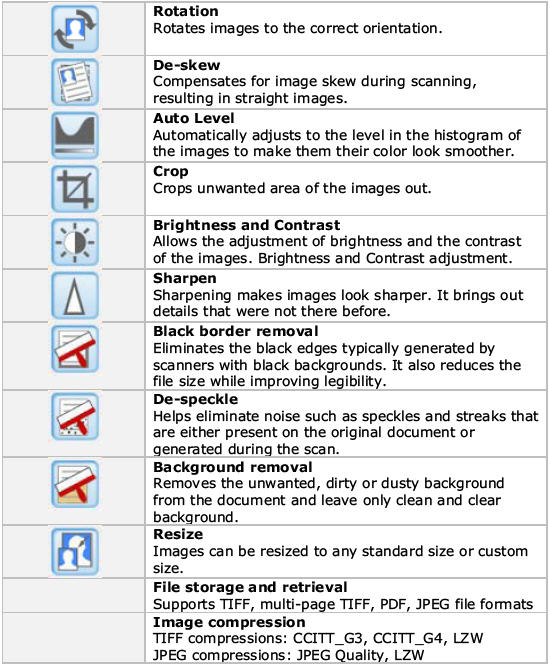
To enable any image operation, just press the icon representing the intended image operation.
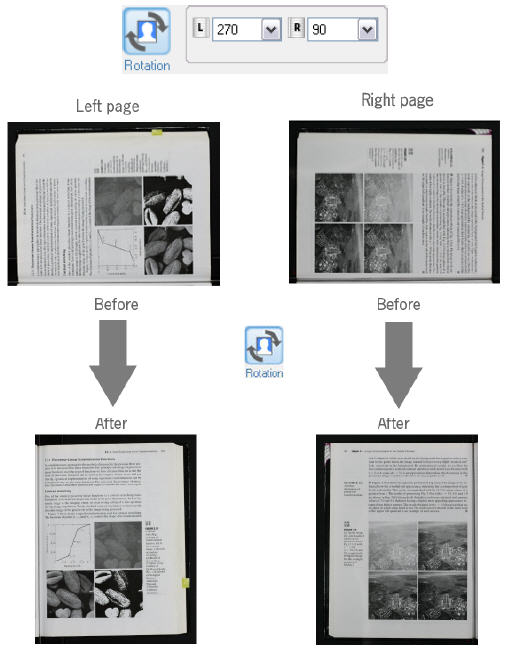
For example, this is what will appear if you want to enable image rotation.
Rotation
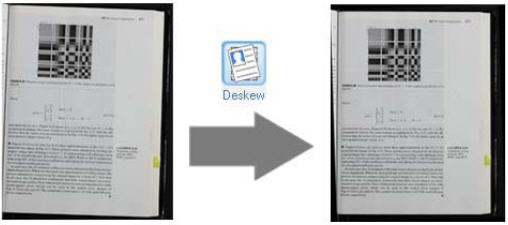
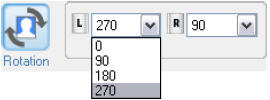 For rotation, you have options to select to rotate 0, 90, 180 or 270 degrees.
Example:
Select Auto if you don’t know the exact degrees to rotate. Alternatively,you can manually set a value that you want the image to be rotated(between -15 to 15 degrees).
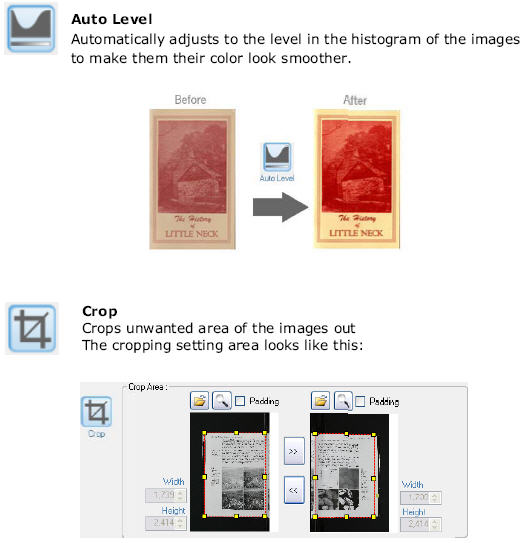
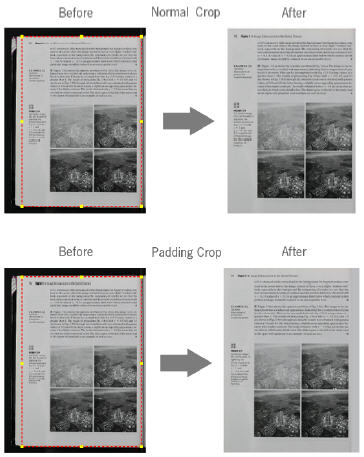
Some available options under cropping image operation include:
![]() Load another image to see its thumbnail related to cropping.
Load another image to see its thumbnail related to cropping.
![]() Preview of how output will look like after cropping and padding.
Preview of how output will look like after cropping and padding.
![]() Copy the parameters of the left page to the right.
Copy the parameters of the left page to the right.
![]() Copy the parameters of the right page to the left.
Copy the parameters of the right page to the left.
Note: The red rectangle that marks a crop area can be moved by a mouse drag.
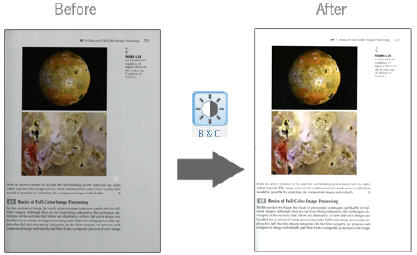
Allows the adjustment of brightness and the contrast of the
images.
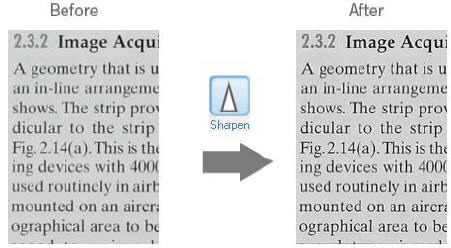
Sharpening makes images look sharper. It brings out details that were not there before.
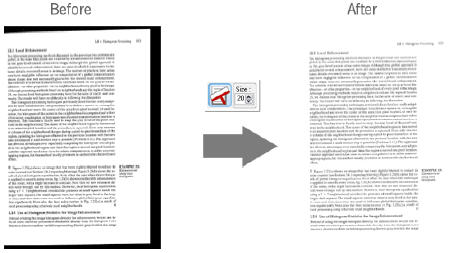
Eliminates the black edges typically generated by scanners with black backgrounds. It also reduces the file size while improving legibility.
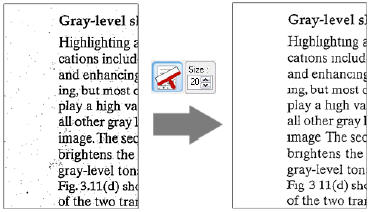
Helps eliminate noise such as speckles and streaks that are either present on the original document or generated during the scan.
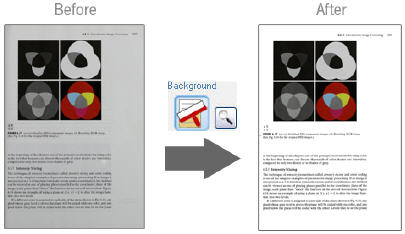
Removes the unwanted, dirty or dusty background from the document and leave only clean and clear background.
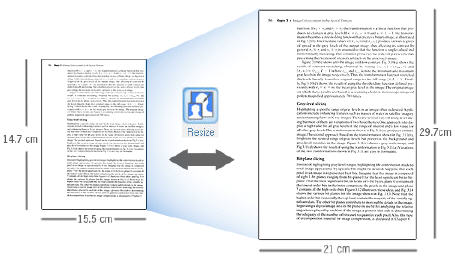
Images can be resized to any standard size or custom size.
Resize
Images can be resized to any standard size or custom size.
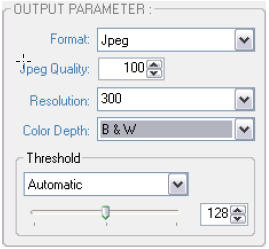
Output file selection
- The available output format options are TIFF or JPEG.
- Available compressions for TIFF are LZW, CCITT G3, CCITT G4
- Users can also select the level of compression for JPEG format by setting its quality level.
- Resolution is where you can set DPI of the output image. You can select 100, 200, 300, 600 DPI or specify the exact desired DPI.
- Available color options are: Black and White, Grayscale and Color.
- As for Black and White conversion, there are many types of conversions allowed. This has to do with the threshold of how a given a pixel is converted to either a black or white pixel.
* Fixed (threshold value is set at 128)
* User defined (users can define other threshold values)
* Automatic (the level of optimal threshold will automatically be selected by the computer).
* Highest Quality (this setting can be known as dynamic localized thresholding, which means there can be many thresholding values on a page. If selected, the program will scan the entire page and automatically adjust the thresholding values for optimal values throughout the pages. This setting will take the longest time but will provide the best quality.)
Once all the settings have been made, it’s time to run the batch image processing operations. Simply hit the Run Batch button.
If you want to stop, click the same button again.
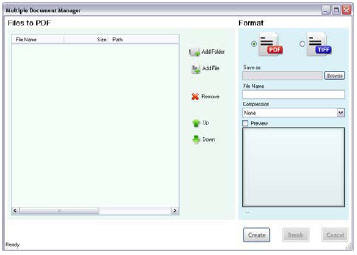
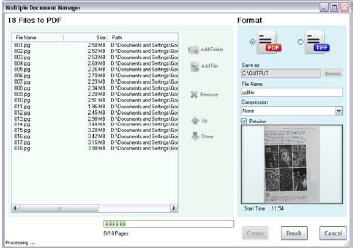
BookDrive Editor 3 and BookSnap can create PDFs or Multipage TIFF by clicking the PDF button.Once clicked, you will see the following window.
Steps
1. Click PDF button.
2. Select the images you want to export to PDF.
3. Select the output format (PDF or TIFF) and other parameters.
4. Click Create.
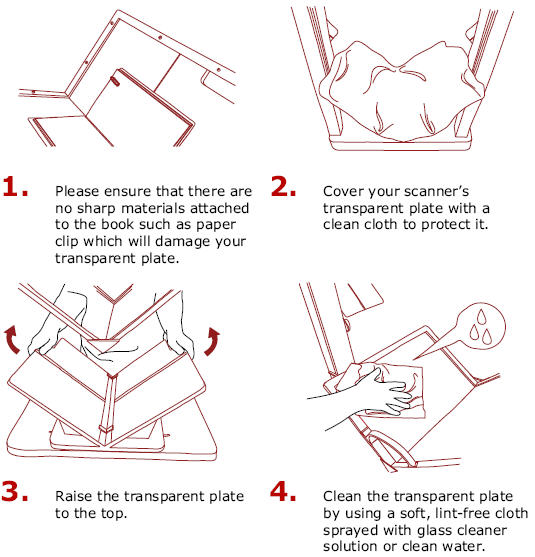
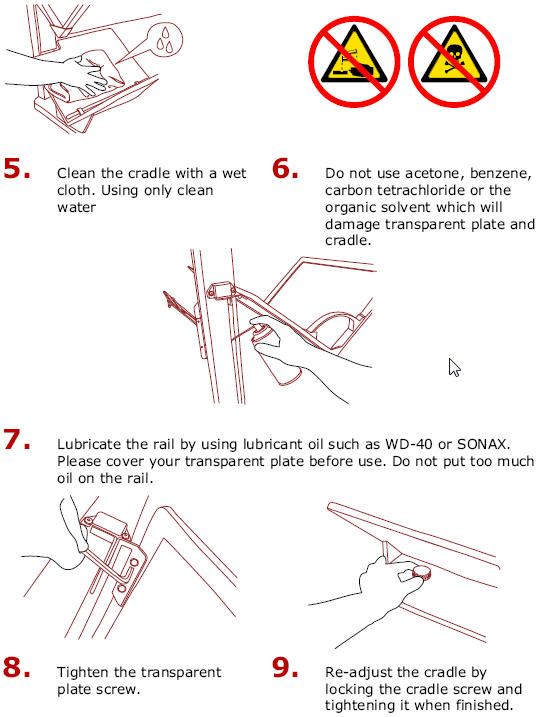
Maintenance
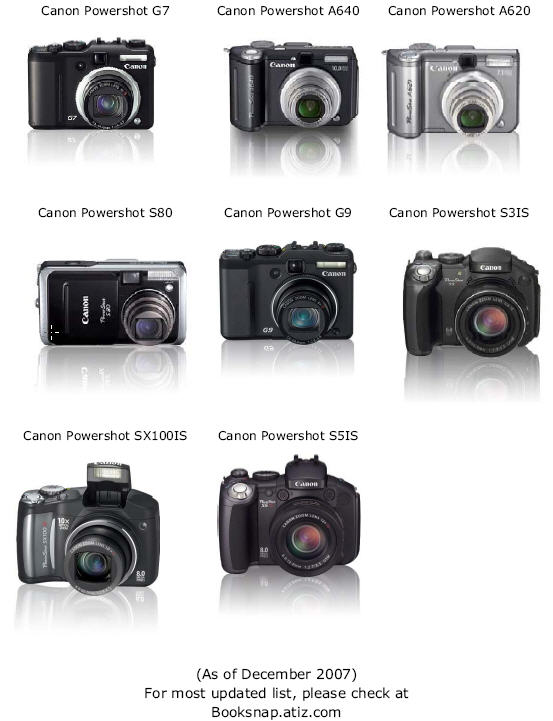
Supported Cameras
Technical Support
More questions?
Please visit http://www.atiz.com/cust_service for more information or contact support@atiz.com for your problems.
link title]</center>
